The Flavour Master Himself: Ottolenghi’s Falafel Done In An Air Fryer
Inspired by Middle Eastern street food – crisp, herby falafel with a lighter, golden finish
Table of Contents
- ✨ Before We Begin…
- The Cook’s Mind
- A Note on Origin
- Ingredient Focus: Chickpeas
- My Favourite Way To Eat
- Serving Suggestions
- Multi-Purpose Recipe
- Why You’ll Love This Recipe
- What Will You Learn Whilst Making This Recipe?
- Handpicked to Go With This One
- Waste Less: How To Use Up Your Ingredient Stash!
- The Flavour Master Himself: Ottolenghis Falafel in an Air-Fryer Recipe
✨ Before We Begin…
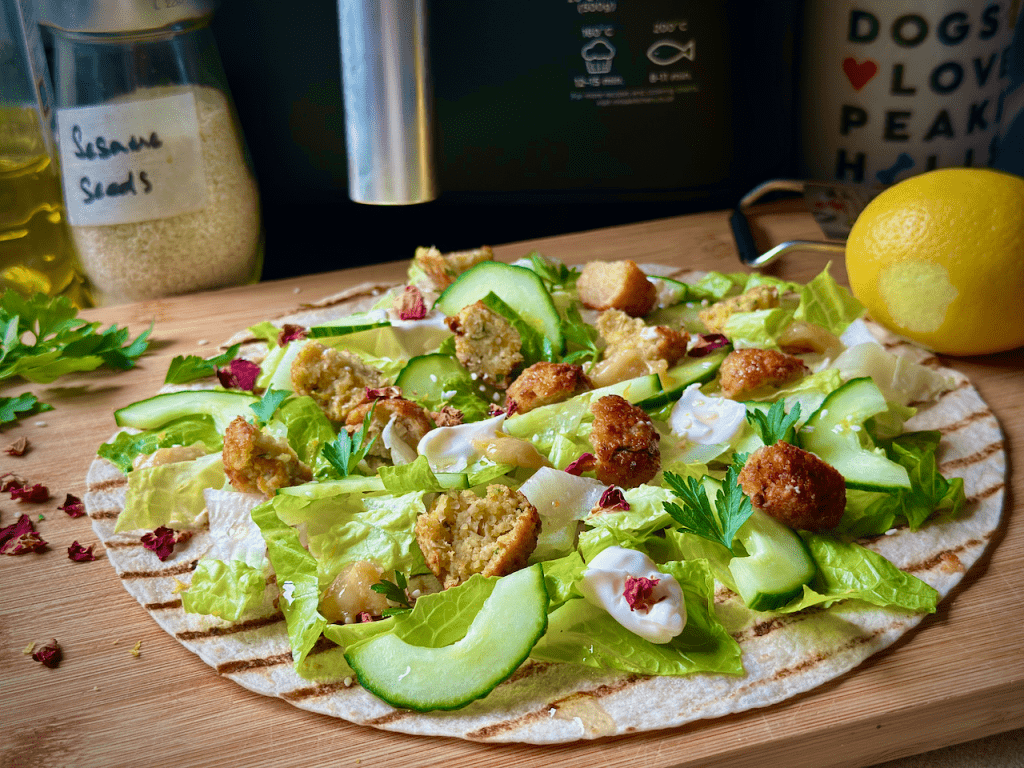
Inspired by the big flavours of Ottolenghi, these falafel are herby, crisp, and deeply satisfying – and made even easier thanks to the air fryer. Served on flatbread with a crisp salad, generous blobs of vegan mayo, and a scattering of rose petals, they’re as beautiful as they are tasty. A little showpiece for everyday joy.
‘Must be best food offer, of any genre, in Kendal. Hugely accomplished cooking and very much recommended.’
Tony P, Kendal; Food Customer
The Cook’s Mind
This recipe teaches you what falafel really is – not a shortcut, not a mash of leftovers, but a dish built from the ground up with raw, soaked chickpeas. You’ll understand how texture, moisture, and seasoning work together to hold shape and deliver that perfect crisp edge with a tender middle. Once you’ve made falafel this way — properly, attentively – you won’t want to go back. It’s quietly powerful, just like the dish itself.
Make-Ahead
You could make the mix ahead of time and freeze it. For best results, leave out the herbs until the day you’re cooking – they freshen the flavour and colour. You can also shape the falafel and freeze them, but they do take up more space and can be fragile until frozen solid.
Freezer-Friendly
- Freeze raw falafel mix or shaped balls.
- Defrost in the fridge before frying.
- Tip: freeze in a single layer, then transfer to a bag or container to save space.
Key Substitution Ideas
- Fresh herbs bring both flavour and colour – if you’re out of parsley, coriander or dill can all work in a pinch.
- Chickpeas are essential here – this isn’t the place to experiment with other beans.
A Note on Origin
Falafel is believed to have roots in Egypt, and has long been a staple across Middle Eastern kitchens – a beloved street food with many regional personalities. This version takes quiet inspiration from the flavours of Palestine and Israel, gently reworked through a modern lens. It’s not trying to be traditional, but it respects what falafel is: bold, nourishing, and far greater than the sum of its parts.
Ingredient Focus: Chickpeas
Chickpeas — nutty, sturdy, and full of quiet power – are the backbone of a proper falafel. Dried chickpeas are key: they bring structure, flavour, and that satisfying texture that canned ones simply can’t match. Soaked and blended, they create a batter that fries into golden, crisp-edged bites with a tender centre – simple, honest, and utterly moreish.
✨ A humble bean with a bold heart.
My Favourite Way To Eat
As a pizza, with a knife and fork. Flatbread, green salad with salad dressing, fresh hot falafel, blobs of mayonnaise, fresh parsley, rose petals and some blobs of preserved lemon. And lemon zest grated over… I demonstrate this way of plating at the end of the video.
Serving Suggestions
In a wrap, on a wrap, a pizza topping, with salad, instead of meatballs in a pasta bake… there are so many uses for falafel. Or simply on their own as a hearty protein snack!
Multi-Purpose Recipe
This recipe has more than one life. Learn to use its elements across different dishes – and start thinking like a cook, not just a recipe follower.
These falafel are a gift that keeps on giving. Tuck them into flatbreads with salad and sauce, yes – but they’re just as good scattered over grain bowls, served with roasted veg, or crumbled into wraps and pittas. Leftovers reheat well and freeze beautifully, and if you make them small, they become crisp little bites to serve with drinks or dip into something tahini-rich and lemony.
Why You’ll Love This Recipe
- They’re crisp and golden without deep-frying – the air fryer does all the work – less oil, no splatter, same satisfying crunch.
- The flavour is full-on and properly seasoned – packed with herbs, garlic, and warm spices – bold, fresh, and balanced.
- They hold their shape beautifully – no crumbling, no stress – just neat little falafel, ready to tuck into anything.
- They’re perfect for batch cooking – make a tray, freeze the rest – they reheat well and keep their charm.
- They’re fun to serve and easy to love – in flatbreads, with salad, or solo with sauce – always a good idea.
What Will You Learn Whilst Making This Recipe?
- How to use dried chickpeas for best texture and structure (no tins here)
- How to season boldly without overwhelming
- How to shape falafel that stay intact and cook evenly
- How to make the most of your air fryer for texture and speed
- How to build a full meal around a single, flavour-packed element
Handpicked to Go With This One
A few recipes that play well together — flavour friends, not just neighbours.
Waste Less: How To Use Up Your Ingredient Stash!
Got something spare – a handful, a spoonful, or the end of a packet? These tags help you find other ways to use it. It’s a small step toward cooking intuitively and wasting less❣️
brown onion, chickpeas, chilli flakes, dried lime, fresh flat leaf parsley, fresh garlic, fresh herbs, green cardamom pod, ground coriander, ground cumin, plain flour
The Flavour Master Himself: Ottolenghis Falafel in an Air-Fryer Recipe
The Flavour Master Himself: Ottolenghi’s Falafel In An Air Fryer
These falafel are bold, herb-packed, and satisfyingly crisp thanks to the air fryer. Made with soaked chickpeas and a well-seasoned spice blend, they hold their shape beautifully and don’t skimp on flavour. Serve warm in flatbread, over salads, or with a swirl of tahini for dipping.
Ingredients
Ingredients for Step 1
- 250 g chickpeas | dried; soak overnight in a large bowl in plenty of water; cover the bowl with a plate
- 1½ litre water | water to soak the chick peas
Ingredients for Step 2
- 90 g brown onion | unpeeled weight; peel and dice the onion neatly into 1 cm dice
- 1 unit fresh garlic clove | grated
Ingredients for Step 3
- ¼ tsp chilli flakes
- ½ tsp ground cumin
- ½ tsp ground coriander
- ½ tsp ground green cardamom
- ½ tsp dried lime | ground
- ½ tsp baking powder
- 15 g plain flour
- ¾ tsp salt
- 12 g fresh parsley | fresh; finely chopped; use other herbs if you prefer: coriander and chive will work well
Instructions
1. Prepare the chickpeas
- Put the chickpeas in a large bowl, have a quick look at them and remove any dark brown ones or anything else you see that's not chickpea! Just have a quick visual check. Cover with the water. The bowl needs to be plenty big enough to allow for lots of water. There should be a great deal of water for the chickpeas. I use a dinner plate to cover the bowl and I leave the bowl in the fridge overnight for at least 12 hours.250 g chickpeas, 1½ litre water
- Tip the soaked chickpeas into the sieve to drain off the soaking water. Rinse the soaked chickpeas with fresh water from the tap.
- Tip the drained and rinsed chickpeas into the food processor. Pulse the processor repeatedly to break up the chickpeas into small pieces.
2. Add the onion and garlic
- Add the diced onion and roughly chopped garlic to the processor.90 g brown onion, 1 unit fresh garlic clove, 12 g fresh parsley
- Pulse the processor repeatedly to break up the onion into smaller pieces, and to thoroughly mix the chickpea, onion and garlic.
- Keep processing the mix. Right so, let's explain how the mix should be. Imagine your perfect falafel. It will have texture but won't be lumpy or need too much chewing. You wouldn't want a smooth paste with the texture of hummus. So be thinking about that as you pulse 😀
3. Add the spice mix and fresh herbs
- When your mix is processed, put all the spices, flour, baking powder and salt into a small bowl and mix together.¼ tsp chilli flakes, ½ tsp ground cumin, ½ tsp ground coriander, ½ tsp ground green cardamom, ½ tsp dried lime, ½ tsp baking powder, 15 g plain flour, ¾ tsp salt
- Tip the spice mix into the processor and pulse again to mix.
- When you're confident that the spices are thoroughly mixed into the chickpea/onion/garlic mix (you can see that it looks consistent and even), add the parsley (or other herb), and pulse to mix, or mix with a spoon. Incidentally, I ask you to chop the herb and add it at the end so you don't run the risk of putting the herb in and then over-processing either the mix or the herb. Preparing the herb separately gives you total control.
4. Make falafel and cook in the airfryer
- The mix makes around 30 balls. First of all, weigh 20g of mix onto a plate so you can see how much 20g is. Then press it firmly into a ball and roll it around between your palms. Once you've done one ball, you'll know how much mix is involved and you won't need to keep weighing the mix. Form the balls! 👌You could cover them and put them into the fridge now if you don't have time to cook them.
5. Pre-heat the air fryer
- Pre-heat your air fryer. I press the 'Air-fryer' button, then the time to 5 minutes and temperature to 200 ℃.
6. Spray the falafel
- You want oil on the falafel before cooking in the air fryer and I've found the best method is to use plenty of cooking oil spray on the balls before you cook them. Kindly note: just spray the balls you are cooking (you'll probably be cooking in two or three batches).I put the ones I'm going to cook onto a separate tray, spray thoroughly, roll them around and re-spray.
7. Cook the falafel
- Place the oiled falafel into the air fryer and cook at 200℃ for 10 minutes.
- Open the drawer every 2 or 3 minutes and roll the balls around to ensure uniform browning.
- Continue to cook in batches.
Video
Nutrition
Calories: 257kcalCarbohydrates: 44gProtein: 13gFat: 4gSaturated Fat: 0.4gPolyunsaturated Fat: 2gMonounsaturated Fat: 1gSodium: 535mgPotassium: 620mgFiber: 12gSugar: 8gVitamin A: 336IUVitamin C: 9mgCalcium: 125mgIron: 5mg
Nutritional values are estimates only and will vary depending on specific ingredients used. Nutrition is per serving. Information is for the main recipe, not optional accompaniments.
COPYRIGHT
© The Golden Polar Bear, 2026. Recipe and photography by Julia Savory. If you share it, please link back to thegoldenpolarbear.com.
Next Steps?
You’ve got the full recipe — now take it further. Inside Black Labrador, you’ll find structured video courses and an ever-growing cookbook designed to help you cook with understanding, not guesswork. Learn, revisit, and deepen your skills at your own pace.
‘Totally recommend the cookery course. The meals are really tasty and full of flavour (not like most of the vegan mush I make for myself).’
Kerry B, Cumbria